

How To Draw An Angel Wing
Create a wonderful Angel Wings cartoon with like shooting fish in a barrel, step-past-pace instructions and video tutorial. Great for kids and beginner artists!
Spring to the footstep-past-step instructions.

The image of two angel wings, disembodied from their wearer and often accompanied by a halo, has go a common element of torso art, vehicle decals, clothing, accessories, and home décor.
At times, this icon is employed as a eulogy for a deceased friend or family member.
At other times, this symbol is used in marketing, as in the case of a popular make of undergarments.
The use of angels and angel-like wings in art dates back millennia. Perhaps the oldest known antiquity of an affections-like effigy in art was discovered in Arab republic of egypt. Dated at four,000 B.C., it depicts a half-adult female, half-bird, winged goddess.
Male figures with wings were used in Assyrian, Babylonian, and Greek fine art as well.
Curl downwards for a downloadable PDF of this tutorial.
During the Byzantine, Medieval, and Renaissance periods, angels were typically depicted as described in the Bible - genderless winged persons, male in form.
From the 1800'south onward, the genderless aspect was oftentimes abandoned in favor of feminine angels.
If y'all would like to draw your ain gear up of wings, yous volition demand but a pencil, pen, or marker, and a slice of newspaper.
This easy, stride-by-step drawing tutorial is designed to aid artists of all ages and skill levels.
Note that each footstep is accompanied by an analogy. The lines highlighted in blue are new additions to each step.
If you liked this tutorial, run into likewise the following drawing guides: Angel, Fairy, and Elsa from Frozen.

Click HERE to salve the tutorial to Pinterest!
Step-by-Step Instructions for Drawing Angel Wings

Begin by cartoon a long, loosely "S" shaped diagonal, curved line.

Draw a mirror image of the commencement line on the opposite side of the page. These lines class the superlative edge of each fly.

From the uppermost signal on each line, describe a curved line, line-fishing downward diagonally. At the stop of this line, draw another curved line, resembling a "U" turned on its side. Draw another sideways "U" shaped line at the end of the latter. These lines course the flying feathers of the wing. Repeat this process to course a mirror paradigm on the reverse side.

Draw more flight feathers beneath those already drawn. Connect a serial of curved, "U" shaped lines, angling towards the lesser end of the original line.

Echo this process on the opposite side to class a mirror image.
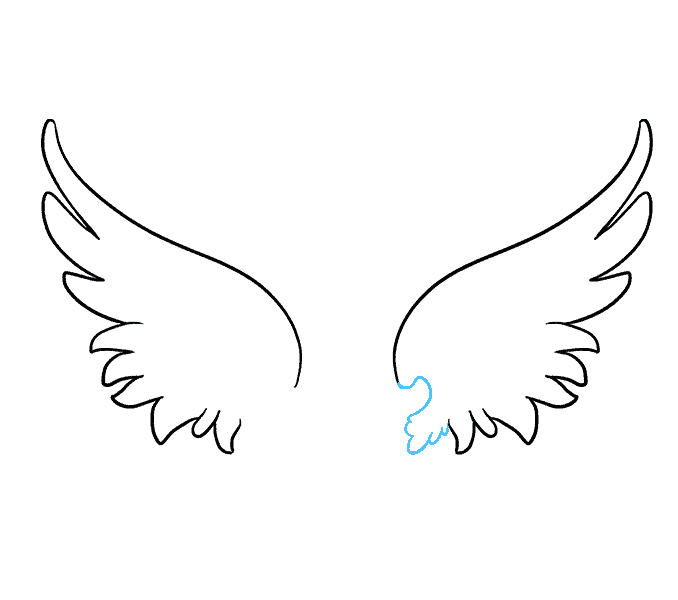
From the lesser edge of the original line, connect a "U" shaped line, looping toward the interior of the wing. Connect the "U" shaped line to the nearest feathers using a series of small, continued "U" shaped lines. These lines class the smaller feathers at the base of the wing.

Repeat this process to form a mirror image on the opposite wing.

Across the top of the wing, draw a series of continued, curved lines, thus adding the texture of feathers. Extend the final curved line to the tip of the uppermost flight feather. Echo on the opposite side to grade a mirror image.

In the eye of the wing, draw a serial of brusk, connected curved lines and "U" shaped lines, thus adding boosted feather texture to the wing.

Repeat on the reverse side to form a mirror epitome.
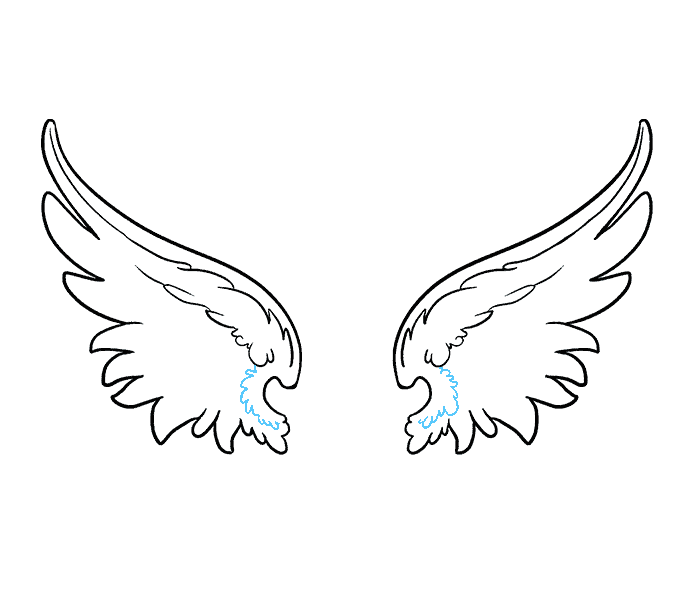
Draw a series of short, connected, "U" shaped lines curving from the feather texture to the lower inner portion of each wing. This indicates the texture of small-scale feathers at the base of the wings.

Draw a serial of continued, "U" shaped lines extending from the lower portion of the wing to the feather texture of the midsection. Permit the "U" shaped lines to grow larger in size every bit they reach the midsection of the fly.

Repeat this process to add the detail of feathers to the contrary wing.

Depict another serial of connected, "U" shaped lines, extending from the middle of the wing. Allow these "U" shapes to be a flake more pointed, and detail the feathers with one or 2 brusque, curved lines extending from the base of each.

Echo to add together feathers to the opposite wing.

Detail the flight feathers using short, curved lines at the base and lower border of each.

Extend a curved line from the top of the wing and the bottom of the concave border. Inside this space, draw short, curved lines to bespeak the presence of feathers.

Echo to form a mirror prototype on the opposite side.

Enclose the interior side of each wing using a wavy line. Above the wings, draw an oval within an oval, forming a halo.

Shade the angel wings.
Printable Drawing Tutorial
Fellow member TROUBLESHOOTING
Still seeing ads or not being able to download the PDF?
First, check that you're logged in. Yous can log in on the member login page.
If y'all're however not able to download the PDF, the likely solution is to reload the folio.
Y'all can do this by clicking the browser reload button.
It is a circular arrow-shaped icon at the superlative of the browser window, typically found in the upper-left side (you can besides employ keyboard shortcuts: Ctrl+R on PC and Command+R on Mac).

Source: https://easydrawingguides.com/how-to-draw-angel-wings/
Posted by: deeringbefiscure.blogspot.com
0 Response to "How To Draw An Angel Wing"
Post a Comment