

How To Stack Makeup For Product Photos

How To Focus Stack Images In Photoshop
Larn how focus stacking in Photoshop tin bring your entire scene or subject into precipitous focus past blending the depth of field from multiple images! Includes tips for getting the best results when taking photos that y'all'll be focus stacking.
In this tutorial, nosotros'll learn how to exercise focus stacking in Photoshop! Focus stacking, or focus blending, means taking a serial of images, each with a different part of your scene or subject area in focus, and blending them together into a single image where your unabridged scene or subject is in focus.
In other words, Photoshop doesn't just blend the images together; information technology blends the depth of field from each image. It takes the more than narrow depth of field from each photo in the serial and combines them into a much wider depth of field, one that's usually wider than you could ever achieve in a unmarried shot.
How does it work? Every bit nosotros'll see, nosotros start by loading the images into Photoshop as layers which stacks them on height of each other. Then, we align the layers so that the size and position of our scene or subject field in each photograph matches upward. Photoshop and so looks at each image and figures out which areas are in focus (yeah, it's actually smart enough to do that), and it automatically creates layer masks to testify only the in-focus areas from each image, hiding the areas that are not in focus. What you cease up with is a unmarried image where everything is in focus!
Focus stacking is perfect for macro photography where information technology's virtually impossible to get your entire subject field in focus due to the incredibly narrow depth of field, ofttimes measured in millimeters. But it's besides not bad for any situation when yous're limited by the amount of calorie-free, forcing you to use a wider aperture which again narrows your depth of field. Past taking a series of shots, each with a different part of the scene in focus, and then blending them in Photoshop, you can bring the unabridged scene into sharp focus from the foreground to the background! If that sounds pretty astonishing, well, the result can be just as impressive as it sounds.
Photography Tips For Focus Stacking
I mentioned that focus stacking starts by loading the images into Photoshop, but that'southward non really true. Focus stacking really begins with the images themselves, and it'southward of import that the photos are taken with focus stacking in mind.
Since this isn't a photography tutorial, I won't go through the procedure of shooting the images in whatsoever bully detail. All the same, here'southward a few simple tips to aid yous take the best images possible so you lot'll get the best results from focus stacking.
- Use a tripod. Mounting your camera on a tripod will not merely preclude camera shake but will also make sure that each photo in the series is taken from the same height, bending and position so they tin be easily aligned later in Photoshop.
- Employ the timer or a cable release. Even with your camera mounted on a tripod, pressing the shutter button can crusade photographic camera shake. To avert it, utilise a cable release, or if yous don't have one bachelor, apply the timer on your camera to delay the shot.
- Use manual focus. Don't let the photographic camera choose the focus points. Instead, set your lens to manual focus and begin and the closest focal point you need (which will often exist the minimum focusing distance of the lens). With each successive shot in the series, turn the focus ring slightly to gradually walk the depth of field across your scene from the foreground to the background. For macro photography, a focus rail works best, but if you don't have 1, the focus ring on your lens works fine.
- Take lots of images. Brand sure you take enough shots and then that every point in the scene or on your subject is in focus in at least one of the photos. Ideally, you'll want the depth of field to overlap from 1 image to the side by side. In general, the more than photos you accept, the better the results you can expect.
The images I shot for this tutorial were all taken with my Canon 5D Marking III mounted on a tripod, and I used a Canon 100mm macro lens set to manual focus. I didn't have a focus rails on manus and then I simply rotated the focus band on the lens between shots, making sure non to rotate it too far so I didn't miss whatever of my subject area.
Here'south the offset epitome in the series. I started at the minimum focusing altitude I needed to become merely the front of the snail crush into focus:
The offset paradigm with the focus on the front end of the shell.
In full, I took 17 shots from the front of the shell to the back. That may sound similar a crazy amount of images, especially for a tiny snail shell. Just recollect, you desire to make sure that every point of your subject is in focus in at least one of the shots, and you lot'll be surprised at how many shots it tin can take, specially with macro photography. And so don't be afraid to take more shots than you demand. You're better off with too many than not enough.
I won't get through all 17 photos here since each one is just slightly dissimilar than the one earlier it, equally I rotated the focus ring on the lens to walk the focal point slowly and steadily from the front end of the shell to the back. Only to give y'all a good thought of what'south happening, here's an image from the middle of the series. Observe that the depth of field has shifted from the front end of the crush to roughly the middle, leaving the front and dorsum out of focus:

A shot from the middle of the series, with only the mid-point of the shell in focus.
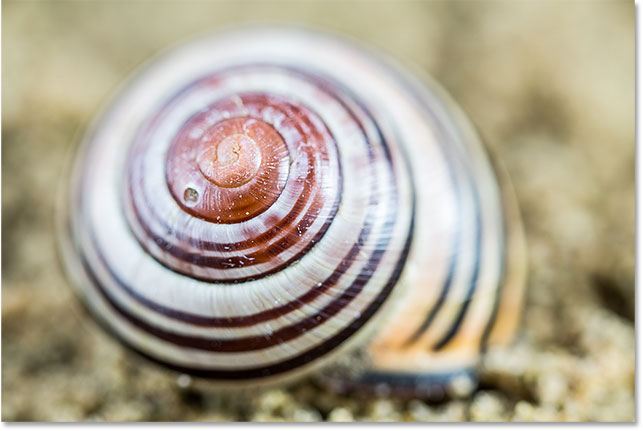
And here'due south the final shot in the series, with just the back of the shell in focus. I purposely left the sand in the background out of focus since I was but interested in the shell:

The last shot in the focus stacking serial.
Just to be articulate, I didn't simply accept these three shots. It took 17 shots to move the depth of field beyond the beat from front to dorsum. In a moment, we'll go through the steps to load the images into Photoshop as layers, marshal the images, and then focus stack them, but here's what the last result will look similar with the entire vanquish in focus:

The final result.
How To Focus Stack Images
Step one: Load The Images Into Photoshop As Layers
Once we've taken our images, the first thing we need to practice in order to focus stack them is load them into Photoshop as layers. You tin can load them into Photoshop directly from Lightroom or from Adobe Bridge, just for this tutorial, we'll larn how to do it from within Photoshop itself.
With Photoshop open on your screen, become up to the File card in the Carte du jour Bar along the top of the screen, choose Scripts, and then choose Load Files into Stack:

Going to File > Scripts > Load Files into Stack.
This opens the Load Layers dialog box, and this is where we tell Photoshop which files we want to load. Set the Use choice to Files (the default setting), then click Browse:
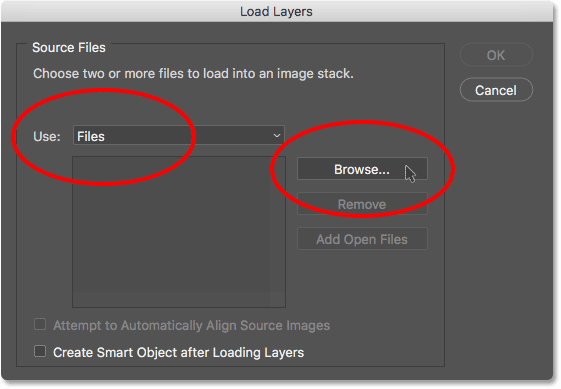
Photoshop'due south Load Layers dialog box.
On a Windows PC, utilize File Explorer to navigate to the location on your computer where your images are stored. On a Mac (which is what I'm using here), use Finder to navigate to your images. In my case, all of my images are stored in a folder on my desktop. As I've mentioned, there'due south 17 images in total.
If you captured your images in the raw format, you tin load the raw files themselves into Photoshop. Only keep in mind that raw files are much larger than JPEG files, and because of that, they'll take much longer to load. They will also take longer to align and to focus stack. I guess what I'chiliad trying to say is, raw files will take longer. You may want to consider first converting the raw files into JPEGs which will greatly speed upwardly the process, as I've done here (nosotros tin can run into the ".jpg" extension at the stop of each file proper noun).
To select the images, I'll click on the starting time image at the top of the list to highlight it. Then, I'll press and hold the Shift key on my keyboard and I'll click on the lesser image in the list. This selects both images plus every image in between. And then, with all of the images selected, I'll click the Open button:

Selecting the images and clicking Open.
Dorsum in the Load Layers dialog box, the names of all the images yous selected announced in the box below the Use option.
At the bottom of the dialog box, you'll meet an option called Attempt to Automatically Align Source Images. By default, it's unchecked, which means it's turned off. We'll come up dorsum to this option after because selecting it will actually save u.s.a. time. But for learning purposes, go out information technology unchecked for now. Click OK to shut the dialog box and load the images into Photoshop:

Clicking OK to load the images.
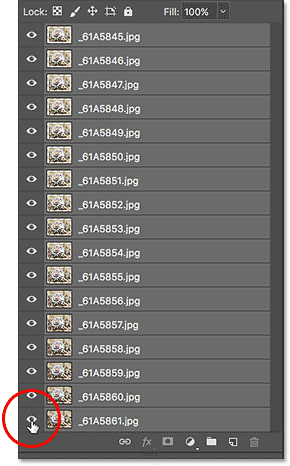
Depending on the number of images and their file type (raw or JPEG), the loading process may take a while. Just when it's washed, all of your images will be loaded into Photoshop and each one volition announced on its own separate layer, as we can see hither in my Layers panel. Photoshop uses the name of each paradigm equally the name of its layer:

The Layers panel showing all of the images loaded as layers.
Step 2: Marshal The Layers
Now that the images are loaded in, the adjacent matter nosotros need to do is align the layers so that our scene or subject in each image lines up. If we had selected the Attempt to Automatically Align Source Images option in the Load Layers dialog box, which we looked at a moment ago, Photoshop would take automatically tried to align the images for us as it loaded them in.
Ordinarily, that'due south what we'd want because it saves time. So once we've gone through this tutorial, feel costless to select that choice from now on and skip this second pace entirely. Merely, for this tutorial, I thought it would be better if we understood why nosotros need to align the images in the outset place. Later on all, if the camera was mounted on a tripod, as mine was, shouldn't the images all be aligned anyway?
You would remember so, but sadly, no. The reason is because of an annoying and unavoidable piddling problem known equally focus animate, and all lenses endure from it to some extent. The term "focus breathing" means that equally we arrange the focal signal of the lens, the calibration of our scene actually changes, even when the position of the camera does non. We've already seen an example of this problem when we looked at three of the images I shot in the series. Allow'due south look at them again, this fourth dimension side-past-side.
Observe that in the start shot on the left, where the focal altitude was closest to the camera, the shell appears big enough to well-nigh fill up the frame from top to bottom. But in the center shot, with the focal distance moved farther abroad, the beat out appears noticeably smaller, even though the camera did non move from its original position. And in the third shot on the right, where the focal distance was fifty-fifty farther, the crush appears even smaller. This is the result of focus breathing. Over again, all iii images were taken on a tripod and the camera's position remained the aforementioned. Yet the scale of the scene changed as the focal distance inverse:

An example of "focus breathing" where the scene changes as the focusing distance changes.
If we didn't align the images, focus stacking wouldn't work because our subject would be a slightly different size in every shot. Aligning the images compensates for this problem by assuasive Photoshop to resize and reposition the images equally needed until they're all in pixel-perfect alignment. Once again, once we've gone through this tutorial, y'all can let Photoshop automatically marshal the images as they're being loaded onto layers by selecting the Try to Automatically Align Source Images selection in the Load Layers dialog box.
We didn't select that option in this case, merely we can still marshal the images. To do that, we first need to select all of our layers. Click on the top layer in the Layers console to select it. And so, press and hold your Shift key and click on the bottom layer. This volition select all the layers at once (you'll run into them all highlighted):

Clicking the tiptop layer, and then Shift-clicking the bottom layer.
With the layers selected, get up to the Edit carte du jour at the top of the screen and choose Car-Align Layers:

Going to Edit > Auto-Align Layers.
This opens the Auto-Align Layers dialog box. There's no need to modify anything here. Just leave Car selected in the upper left corner and click OK:

Leaving Auto selected and clicking OK.
Again, depending on the number of layers and whether you're working with raw files or JPEGs, it may take a while for Photoshop to align everything. A progress bar will go along you company while yous wait. When Photoshop is done, the result will expect something similar this:

The result after auto-aligning the layers.
If yous await closely effectually the edges of the in a higher place image, yous'll see what looks like a series of faint borders or frames. That's the event of Photoshop resizing the image on each layer to compensate for the focus breathing problem.
To better encounter what Photoshop has washed, I'll temporarily plow off every layer in the certificate except for the tiptop layer by pressing and holding the Alt (Win) / Option (Mac) fundamental on my keyboard and clicking the peak layer's visibility icon in the Layers panel:
Holding Alt (Win) / Selection (Mac) and clicking the top layer's visibility icon.
The top layer holds the get-go image in the serial (the one where only the front of the beat is in focus). With all the other layers turned off, we tin can see that Photoshop resized this image to line it upward with the others. Observe the checkerboard pattern creating a border around the image. That's how large the image was originally. Afterward aligning the layers, the image is now much smaller:

Photoshop resized images to marshal them.
For comparing, let's speedily await at the image from the middle of the series (the one with the heart of the beat out in focus). I'll again press and concord the Alt (Win) / Option (Mac) key on my keyboard and I'll click on the visibility icon for its layer:
Belongings Alt (Win) / Choice (Mac) and clicking the middle layer'south visibility icon.
This hides the elevation layer and shows only the middle layer in the document. Here again, we see the checkerboard pattern effectually the image showing us that Photoshop resized the photograph to line it up with the others.
Notice, though, that Photoshop did not need to resize this i quite as much. That'due south because the difference in scale betwixt the images (caused past focus breathing) decreases every bit we become closer to the last prototype in the series, and so less resizing is needed:

Images closer to the end of the serial need less resizing than images closer to the kickoff.
Finally, let's expect at the terminal image (with the back of the beat in focus). Again, I'll press and hold the Alt (Win) / Choice (Mac) key on my keyboard and I'll click on the visibility icon for the bottom layer:
Belongings Alt (Win) / Option (Mac) and clicking the bottom layer'southward visibility icon.
And this time, nosotros come across that Photoshop barely touched this image at all. Essentially, Photoshop resized and repositioned all of the other images to line them up with this i:
The concluding image in the series was pretty much left solitary.
To plough all of the layers back on, with my Alt (Win) / Option (Mac) primal nonetheless held down, I'll click once again on the visibility icon for the bottom layer, and at present all of the layers are over again visible:
Holding Alt (Win) / Option (Mac) and clicking the same visibility icon.
How to auto-align and composite images in Photoshop
Step 3: Auto-Alloy The Layers
We've loaded the images into Photoshop as layers and we've aligned the paradigm on each layer. All that's left to practise now is focus stack them!
Showtime, make sure that all of your layers are selected. If they're not, click on the top layer in the Layers panel to select it. Then, hold your Shift key and click on the bottom layer to select them all:
Clicking the peak layer, then Shift-clicking the bottom layer.
With the layers selected, get up to the Edit menu at the top of the screen and this fourth dimension, choose Automobile-Blend Layers:
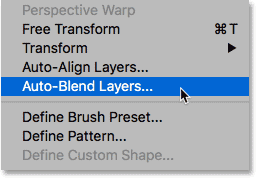
Going to Edit > Automobile-Alloy Layers.
This opens Photoshop'south Auto-Blend Layers dialog box where nosotros have ii main options. We tin create a panorama of the images, or nosotros can focus stack them. Select the Stack Images option. Too, make sure that Seamless Tones and Colors is selected (checked).
If you're using Photoshop CC as I am here, yous'll see a new option at the very bottom, Content Aware Fill Transparent Areas. This pick lets Photoshop try to fill in whatever transparent areas that appear around the edges of the image afterwards focus stacking. We're going to crop the image anyway after information technology's washed so just ignore this pick:

Selecting Stack Images and Seamless Tones and Colors.
The new Content-Enlightened Ingather Tool in Photoshop CC
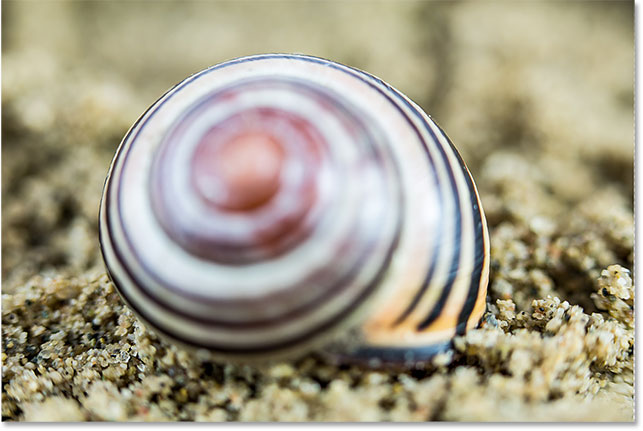
Click OK to shut out of the dialog box and permit Photoshop begin the focus stacking process. Over again, it may have a while depending on the number of images and their file type. When it'south done, you should see the depth of field from each image blended together, bringing your entire subject (or scene) into focus. In my case, the beat out is at present entirely in focus from front to back:

The shell is now completely in focus afterwards stacking the images.
If we await in the Layers console, nosotros see what'south happened. Photoshop looked at the image on each layer to figure out which part of the image is in focus. Information technology and so created layer masks for each prototype so that just the in-focus areas remain visible.
We tin can come across the layer mask thumbnail to the right of each layer'southward preview thumbnail. Black on the mask is the area of the image that's now hidden. White is the area that remains visible. If you're using Photoshop CC, yous'll notice that Photoshop also merged all of your layers onto a new layer above the others:

The Layers panel showing the layer masks that Photoshop created to keep only the in-focus areas visible.
Note: If you're using Photoshop CS6 or earlier and you want to create a split, merged re-create of your layers, click on the pinnacle layer in the Layers panel to select it. And so, press and hold the Alt (Win) / Option (Mac) key on your keyboard. With the key held downwards, get upwards to the Layer menu at the elevation of the screen and choose Merge Visible.
Step 4: Crop The Image
If nosotros look around the edges of my photo, we run into that while the crush itself looks neat, non everything is perfect. There'southward harsh transitions between in-focus and out-of-focus areas, making the areas around the beat out expect blotchy:
The beat looks great, but some of the areas around it look pretty bad.
To gear up that, all nosotros demand to do is ingather the image. I'll select Photoshop'southward Crop Tool from the Toolbar:

Selecting the Crop Tool.
Then, I'll simply resize the cropping border so information technology'due south positioned around the area I want to keep. Everything outside the border will exist cropped away:

Resizing the cropping border around the shell.
I'll printing Enter (Win) / Return (Mac) on my keyboard to commit the crop, and here, after cropping away the trouble areas effectually the edges, is my final focus stacking result:
The final result.
How To Focus Stack Images In Photoshop - Quick Summary
We covered a lot in this tutorial, so here's a quick summary of the steps you lot need to focus stack images in Photoshop:
- In Photoshop, go upward to the File carte in the Menu Bar, choose Scripts, then choose Load Files into Stack.
- In the Load Layers dialog box, fix Use to Files, then click Browse. Navigate to your images on your figurer, select them and click Open.
- Dorsum in the Load Layers dialog box, select Attempt to Automatically Align Source Images, then click OK.
- In the Layers panel, click on the superlative layer, then Shift-click on the bottom layer to select all layers.
- Get up to the Edit carte in the Carte du jour Bar and choose Auto-Blend Layers.
- Crop the prototype with the Crop Tool to remove problem areas around the edges.
Other Stuff
© 2022 Photoshop Essentials.com.
For inspiration, not duplication.
Site pattern past Steve Patterson.
Photoshop is a trademark of Adobe Systems Inc.

How To Stack Makeup For Product Photos,
Source: https://www.photoshopessentials.com/photo-editing/focus-stack-images-photoshop/
Posted by: deeringbefiscure.blogspot.com
0 Response to "How To Stack Makeup For Product Photos"
Post a Comment